The GEDmatch One To One Comparison reports are included in the free tier of tools on the website.
Don’t be overwhelmed by the lengthy visual display or the large number of parameters. This article explains your choices, and how to read the results.
What Are The One To One Comparison Reports On GEDmatch?
The One To One comparison reports let you compare two GEDmatch kits with greater accuracy than other reports.
The display shows details of matching segments that are above specified thresholds. Details include:
- matching chromosome(s)
- start and end locations
- number of SNPs
- cM size
The free tier has two types of reports:
- “One To One Autosomal” compares chromosomes #1 to #22
- “One To One X” compares only the X chromosome (#23)
The paid tier provides an additional autosomal report that uses a matching algorithm with improved accuracy. This is called the Q-Matching report.
Why You Should Run One To One Reports
There are three common reasons for using the One To One reports:
- Confirm that a match listed in other reports is genuine
- Identify common mistakes with uploaded files
- Help identify where the match fits in your family tree
Confirm that a match is genuine
The One To One report is more accurate than the One To Many or the “Match Both Or 1 Of 2” reports.
The other reports have a lower degree of accuracy when calculating DNA matches.
This means that they may produce false positives. The One To Many Report could show a matching kit that doesn’t pass the One To One comparison.
This is why the GEDmatch documentation says you should always run a One to One report before contacting a DNA match.
This isn’t a problem at higher levels of shared DNA i.e. you’re not going to get false matches for second cousins. But you may be surprised at where the problems kick in. The worst I’ve seen is described in a thread on the WikiTree forum. The One To Many report showed a 12 cM match that got kicked out by the One To One report.
Identify mistakes with uploaded files
When people manage multiple DNA kits, they sometimes make mistakes when uploading a new kit.
For example, a user intends to upload her sister’s kit but mistakenly picks her own file during the upload process. This means her DNA is on GEDmatch twice, and her sister isn’t there at all.
This can cause all kinds of confusion and alarm. You should be cousins but you don’t see the sister’s name/alias on your One To Many report?
Use the One To One report to double-check before drawing conclusions about parentage.
If you run the report on the two sisters’ kits, they may come back as being a near 100% match. Unless the supposed siblings are identical twins, you now know that the same kit has been uploaded twice.
Help identify where the match fits in your tree
This is the goal for most of us when we use the One To One report. We’re looking for insights or hints towards a common ancestor.
You are not going to identify a relationship with a single report. However, repeated use on multiple kits can help you build up a set of DNA matches that share DNA on the same segments.
I’ll get back to this in a later section.
How To Launch One To One Reports
There are several ways to launch the One To One Comparison Reports.
Both the Autosomal and X comparisons are available under the Tools menu on the Home Page. When either report opens, you need to provide two kit numbers.
Launching from the One To Many report
However, you can also launch the Autosomal report from within the One To Many report. This is a handy way of pre-filling the kits.
When you scroll across the One To Many Report, you’ll see the “Largest” column in the Autosomal section. This shows the size of the largest segment, but it is also a hyperlink that launches the One To One Autosomal Report for the selected kit.
Commonly Used Parameters
When you open the One To One report, you’ll see a lot of parameters. Don’t be overwhelmed by the number of the somewhat obscure names.
Most of these parameters are for specialist use, and you don’t need to worry about changing the defaults.
I’ll look at the specialist parameters in the next section. Here, I’ll go through the parameters used more commonly.
Kit Numbers
If you don’t launch the One To One from another report, you’ll need to fill in both kit numbers.
You don’t need to use your own kit for the comparison. I’ve already mentioned using the report to check for duplicate kits.
But you can also use the report to check which segments match between two of your DNA relatives.
Graphics on or off
This parameter toggles whether you get a graphical display of every chromosome, or solely comparison tables.
I’ll explain the bar display later, but I’ll suggest here that the graphical option is great when you’re starting out with GEDmatch.
It’s designed to help you visualize matching DNA across your chromosomes, and it does a good job.
However, it becomes a bit tiresome when you have to scroll past twenty displays with no significant matching to get to the interesting chromosome at the bottom! You’ll quickly learn when you want the graphics or not.
Minimum segment size
I’ve skipped past some parameters that I consider are for specialist use. (Mainly because I don’t use them!)
The default segment size is 7, and I rarely change this.
However, if you are dealing with endogamy then you will probably want to increase the threshold. 15 cM could be a good cut-off point.
Windows resolution
The default size of 1000 works well for a reasonable size of monitor.
But if you’re working with a small display, you can experiment with reducing the Windows resolution. Your aim is to avoid having to use the scrollbar to see the full width of the chromosome displays.
The “full resolution” option gives you display where the resolution is high enough to show one SNP per pixel. You’ll have a lot of scrolling on a normal monitor! I don’t use this option.
Prevent Hard Breaks
I debated with myself as to whether to put this into the “Commonly Used” section. Many GEDmatch users always toggle the option on instead of keeping the default. Personally, I rarely change it.
So, let’s take a look at what this option gives us.
There are areas on our chromosomes that DNA testing hardware doesn’t sample as heavily as others. This means that there are gaps of untested DNA that would normally be classified as “not matching” by GEDmatch.
But suppose two kits are from a parent and child? We inherit entire chromosomes from a parent. The default GEDmatch behavior will reduce the estimates of how much DNA is shared due to artificial constraints.
The “Prevent Hard Breaks” option mitigates the effect of these sparsely sampled areas (it prevents the gaps from being treated as hard breaks in matching DNA).
So, should you turn the option on? If you’re researching close relatives, then it’s probably a good idea. I don’t have enough close relatives on GEDmatch to bother with this one.
Specialist Parameters
Many of the parameters on the One To One report are for specialized scenarios. I’ll touch upon each of these here.
Builds to display
The technology used to test DNA continues to improve. The DNA testing companies periodically upgrade the chips that analyze their customers’ kits.
This brings challenges to sites like GEDmatch when they are comparing DNA results prepared with different versions of the technology i.e. different “builds”.
I provide an in-depth explanation about this in our article on GEDmatch overlap.
Here, I’ll mention that you can tell the autosomal report to take account of specific builds. I’ve never bothered to do this.
SNP window size threshold
You can choose to reduce the number of SNPs that GEDmatch uses to evaluate if matching DNA is significant or not.
Unless you’re at an advanced level, I’d advise not messing with this.
Size (in SNPs) of Mismatch-Bunching limit
This parameter is related to the previous one.
It can come into play with specialist scenarios, but you can skip this with common usage.
How To Read A GEDmatch One To One Report
This section covers both the Autosomal and the X-DNA report. The displays are the same for both.
By default, the One to One report gives you a visual display for every chromosome.
It may look at first like someone has splashed random buckets of paint onto the screen, but you’ll soon get used to the display.
Visual display of one chromosome
Here’s an annotated example of the visual display of one chromosome.
Chromosome 16 has patchy blocks of matching DNA. This shows in the top bar as alternating narrow strips of yellow (matching) and red (non-matching).
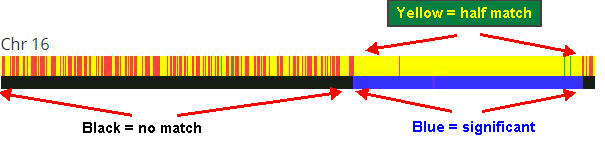
The yellow strips aren’t wide enough to meet the threshold of a significant matching segment. So, the bottom bar shows a long black strip that is classified as “no match”.
But things get interesting at the upper locations of the chromosome. Notice how the bottom bar has changed to a lengthy strip of blue.
Notice how the top bar has a few tiny strips of red (no match) and green (full match) The lengths are too small to be significant.
Text display
Let’s take a look at how the standard display actually looks. It combines the visual display and a table of data above it:
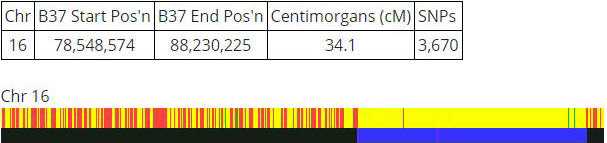
The table tells us the starting and end positions of that blue section of the bottom bar.
The length of the yellow matching section is 34.1 centimorgans, and this is made up of 3,670 SNPs.
What are SNPs?
The other reports show centimorgans, and you can focus on those numbers. SNPs are even smaller units of DNA. I’ve written in-depth on SNPs in our article on GEDmatch overlap.
Full match versus half match
I talked about matching DNA in the example above, but I didn’t mention that the yellow shows this to be a half match instead of a full match.
Each bar represents a pair of chromosomes. You inherit a chromosome from each parent, so your matching DNA will usually be solely due to one half of the chromosome pair. This is what is meant by a “half match”.
A green full match is where the DNA is shared on both your maternal and paternal sides. This applies to a small number of scenarios:
- Full siblings
- Double first cousins
- Parents are distantly related
Using the full display
I’ve just shown a single chromosome from the display. Of course, the autosomal report shows 22 chromosomes.
Unless you’re looking at closer relatives, you may have a lot of scrolling to do to get to the one or two chromosomes that have matching DNA.
You may prefer to skip the displays of non-matching chromosomes, and only see the data for chromosomes with matching segments.
The report parameters include a toggle to turn off the default graphical display. Switch the “graphic bar/numeric positions” option to “Position only”.
One To One X-DNA Comparison Report
Below is an example of the One To One X-DNA Report for a mother and daughter. I could show you the report from the daughter and her niece, but it’s almost identical.

Notice how there is a black patch in the bottom bar? This is an area of unmatched DNA, which acts as a hard break.
As a consequence, the matching DNA falls into two different segments of 82.7 and 105.1 centimorgans.
But a daughter inherits the X chromosome from her mother. So we know that the display doesn’t match reality.
In fact, it matches an artificial limitation of the DNA testing technologies. I’ve discussed this in the earlier section on Commonly Used Parameters.
Prevent hard breaks
This is where the “Prevent Hard Breaks” option comes into play. When I turn on this parameter, the report shows like this:
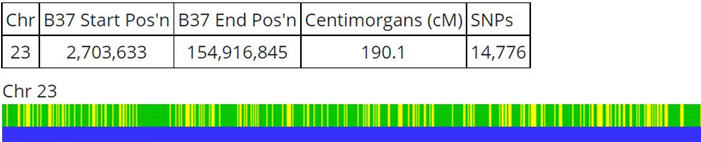
Notice that the black segment has disappeared, with the hard break removed. Now we have a continuous segment of matching DNA to 190.1 centimorgans.
Other GEDmatch Tools And Reports
Your starting point on GEDmatch is usually to review your full list of DNA relatives on the site. Check out our comprehensive guide to the One To Many Comparison Report on GEDmatch.
You can also view matches in common between two kits. GEDmatch refers to shared matches as “People Who Match Both Kits”. Check out our guide to using shared matches on GEDmatch.
The One To One Comparison tool has a chromosome browser for two kits. There is an alternative chromosome browser in the free tier which runs for multiple kits. We have a tutorial on using the GEDmatch 3D Chromosome Browser.