The Segment Search tool is part of the paid tier on GEDmatch. It shows you the chromosomes and locations where you share DNA with all your matches.
The report shows all matches who share DNA with you on a specific chromosome. You can further restrict to a start and end point within a chromosome.
You can use the free tools to get the same information per DNA match. But the Segment Search tool gives you a powerful shortcut for your research.
Why Segment Search Is Useful
You may be familiar with the Shared Match feature on your source DNA website. GEDmatch has a similar tool in the free tier. We have a separate tutorial on GEDmatch shared matches.
I’ll use an example from running the GEDmatch “People Who Match Both Kits” tool for a DNA match who I happen to know is my 3rd cousin on a specific line.
But when viewing our shared matches, I can’t know whether the other kits descend on the same line.
It’s important to remember that a group of matches who share DNA may do so through different lines i.e. different common ancestors.
Using free tools to examine the shared DNA
Using the free tier, the next step is to examine the shared DNA for each kit. Our tutorial on the One To One Comparison Tool gives a full description.
Here, I’ll mention that when I run this report five times for the top five shared matches, I can see that I only share DNA with one of the kits on Chromosome 4. While another kit is exclusively shared on Chromosome 9.
In theory, I can continue to run the One-To-One tool for each shared match and make notes on which chromosomes have shared DNA at which positions.
But this is why I shell out the ten bucks to access the paid tier.
The advantage of the Segment Search
The Segment Search display lays out the precise chromosomes and locations of your shared DNA with all your matches.
This lets you avoid endless clicking for one-to-one reports. Plus, stacking the display gives you a powerful visual.
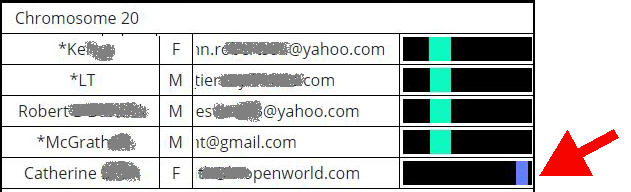
Spot the odd-one-out in the display below. If these were the top five shared matches between myself and another kit, I’d immediately decide to exclude Catherine from my research of a single branch.
Three Different Ways To Run The Segment Search Tool
You have three main choices when running Matching Segment Search. You can choose to run the analysis
- across all your chromosomes
- across one chromosome
- on one chromosome at a specific start and end position
You get the same details at each level. In other words, running the report for all chromosomes is the same as running it 23 times for each chromosome pair.
It may seem to be quicker to run the full analysis. But in practice, I prefer to work at the chromosome or position level.
It’s not just that there’s less scrolling to work through the screen. The full report also can take up to ten minutes to run, while the single chromosome analysis is ready in a few seconds.
Report Parameters
When you open the Segment Search tool, you’ll see a lot of parameters. Most of these parameters are for specialist use, and you don’t need to worry about changing the defaults.
I’ll run through each in this section, and tell you when I overwrite the defaults.
Kit Numbers
As with most GEDmatch tools, you aren’t restricted to running this on your own kit.
Max number of closest relatives to consider
I usually keep the default of my top 1,000 matches.
Builds to display
I always keep the default here, but I’ll give a brief explanation.
The DNA testing companies continue to upgrade the chip technology that analyzes our samples.
This means that sometimes you are comparing your kit with DNA matches that were tested with older or newer versions of technology i.e. different “builds”. I provide a lot more explanation about this in our article on GEDmatch overlap.
You could change the default build, but I’ve never bothered to do so.
SNP count minimum threshold
Don’t mistake this for the minimum number of centimorgans! That’s the next parameter.
I always keep the default for this one.
Minimum segment size
The default segment size is 7. I rarely change this.
If you have significant endogamy in your family tree, then you may want to double the threshold.
Prevent Hard Breaks
I don’t bother changing this default because I don’t have close family matches on GEDmatch, not even a first cousin.
Turning the option on will give you better quality estimates for close matches.
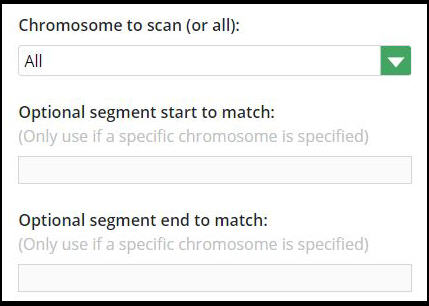
Chromosome to scan (or all)
This is a key parameter that I usually change from the default of “all chromosomes”.
The drop-down lets you pick a single chromosome pair.
If you don’t set the next two parameters (start and end position), the report will run across the entire chromosome.
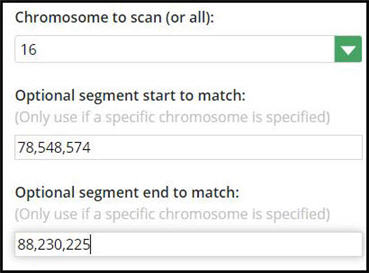
Optional segment start to match
If you want to check a narrow stretch of the specified chromosome, you enter the starting position. The number will probably be high e.g. 78,548,574.
If you’re not sure how to know which locations to pick, we have a worked example later on.
Optional segment end to match
If you use the start position, you’ll want to set an end position. Again, we have a worked example that will make this clear.
Show graphic bar for Chromosome?
This parameter toggles whether you get a graphical display or the raw data in a table format.
Some users prefer to download the segment match data to spreadsheet and work with other tools. That’s when to turn off the graphic bar.
Scenario 1: Overview Using All Chromosomes
The full report across all your chromosomes will light up your screen with color.
To get there, leave the default parameters set to “All” chromosomes.
Interpreting the display
Use the full report to scan for interesting groups of matches that stack up at the same locations on specific chromosomes. These stacks are likely (but not guaranteed) to descend from a common ancestor.
I use this display as a launching point. I’ll make notes about interesting stacks of matches by jotting down the chromosome numbers for further research through the narrower options.
Segment Search colors are not significant
The colors in the bar display don’t have special meaning.
GEDmatch cycles through different shades to ensure that one stack stands out from the next.
Watch out for research kits
Currently, my full display has one Kit Number that pops up across nearly every chromosome.
Wow, is this an unknown close relative? No, it’s a piece of research that’s gone wrong.
The name of the kit is a giveaway:
- Ust-‘Ishim-Related Lipka Tatar-Zaporozhian Cossack-Related DNA
Someone has attempted to replicate typical DNA results for ancient hunter-gatherers whose remains were found in the Ust’-Ishim district in Siberia.
I say it’s gone wrong because this kit is matching far too much of my DNA. You’ll learn to spot these. Yes, they are irritating.
Scenario 2: Starting With A Known Match
This is one of my favorite research paths on GEDmatch.
I have no close matches on GEDmatch. I share 38 cM with the highest match, and I don’t know our connection.
Instead, I’ll start with a distant match where I know our common ancestor and where the match fits in my family tree.
My example is a 3rd cousin once removed. I actually identified our connection through her tree on MyHeritage. Thankfully, she uses the same username on GEDmatch, where she hasn’t uploaded a tree.
Step 1: use the One-To-One comparison tool
The first step is to use the One To One comparison tool to get the exact details of which chromosome segment(s) you share.
In my example, my DNA relative Marie shares DNA on our 16th chromosome pair at the specific positions shown in the display.

Step 2: Use the Segment Search for a chromosome and/or position
In this example, I run the Segment Search for Chromosome 16.
I could enter the specific start and end positions given in the One-To-One display. I usually don’t, because I don’t have a huge number of DNA matches on GEDmatch.
However, if you have considerably more and want to avoid clutter – you can copy-and-paste the start and end positions from the One-To-One display. I’ve done so below:
Step 3: Review your shared stack
In the excerpt below, Marie is the 3rd cousin who is my known starting point.
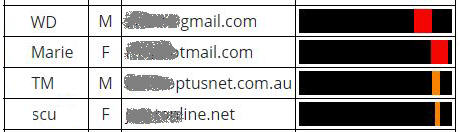
Things also get interesting when I look for WD, TM, and Scu on the list of “People who match both kits” with Marie. The first two are listed as shared matches, but Scu is not.
Notice how Scu is a very thin line? Taking a closer look at the display, I see that this match is creeping over the minimum threshold and only shares 7.6 cM with me. At this point, I’ll put Scu aside as a possible false positive.
Also, notice how WD at the top is hardly overlapping with Marie and the smaller matching segments.
What conclusions can I draw? Well, nothing concrete at this point. But this guides me on how to prioritize my research. Having set SCU and WD aside, I’ll focus more closely on TM.
My goal now is to research whether TM shares the same common ancestor as my known cousin Marie.
Step 4: Try Your Hand At Triangulation
Having used the Segment Search, you’re a few steps away from using a method called triangulation. This can be very effective for your research.
We have a tutorial with a full example of using triangulation on GEDmatch.