A nine-generation tree goes all the way up to 256 great-great-great-great-great-great-grandparents.
Our family tree layout in Google Sheets prints across multiple portrait pages that can be taped together.
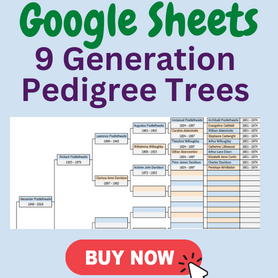
If you’re too busy for the sixteen steps in this tutorial, jump down to the end to grab our “done for you” Google Sheets template bundle.
- What The 8-Generation Pedigree Tree Looks Like
- Step 1: Set Column Widths And Row Heights
- Step 2: Start With The Father Name Box
- Step 3: Copy For Male Ancestors From The 3rd To 7th Generations
- Step 4: Create The Paternal Grandmother Box
- Step 5: Copy For Maternal Ancestors In The 4th To 7th Generations
- Step 6: Create The 8th Generation
- Step 7: Create Connector Lines From The Father To His Parents
- Step 8: Connector Lines From The 3rd to 4th Generations
- Step 9: Connector Lines From 4th To 5th Generations
- Step 10: Connector Lines From The 5th To 6th Generation
- Step 11: Connector Lines From The 7th To 8th Generation
- Step 12: Create The Home Person
- Step 13: Print Settings
- Done-For-You Bundle
The 9-Generation Pedigree Tree Layout In Sheets
The picture below shows what the top of the tree looks like (I’ve had to zoom out to show it).
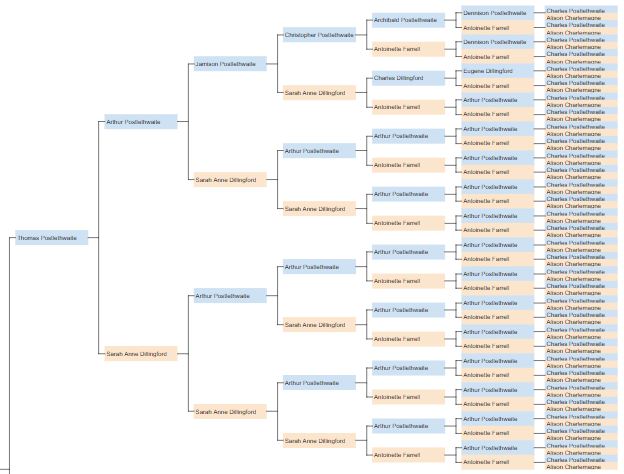
This structure is repeated many times down the tree. That repetition lets us use a lot of cut-and-paste to reduce the time spent laying this out.
More or less?
If you want one more layer, we have a tutorial on creating a ten-generation tree in Google Sheets.
Step 1: Set Column Widths And Row Heights
Create a new worksheet.
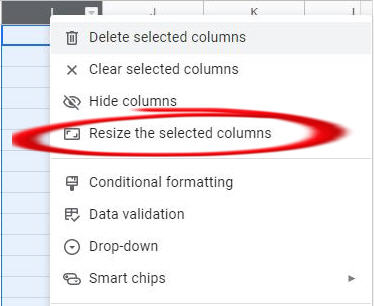
To change the width of any column, follow these steps:
- Select the entire column by clicking on the letter at the top.
- Right-click and choose “Resize column” from the drop-down menu.
- Enter the sizes below (this is in pixels).
Set these sizes:
- Set columns A, C, F, I, L, O, R, U, X to 23.
- Set columns B, E, H, K, N, Q, T, W, Y (nine columns) to size 159.
- Set columns C, F, I, L, O, R, and U to 23.
- Set columns D, G, J, M, P, S, V to size 12.
Set this column height:
The spreadsheet needs at least 256 rows which makes this a long tree.
I want to use the least amounts of printed pages. That means that I decrease the row heights from the default.
- Select rows 1 to 260.
- Right-click and choose “Resize row” from the drop-down menu.
- Enter size 15.
Step 2: Start With The First Grandfather Name Field
We start with the first section of the tree by adding the first grandfather.
Then we can save a lot of effort by copying this section three times.
Follow these steps to create the first name field.
Merge two cells
- Select cells H32 and H33.
- Expand the Format menu in the top ribbon and choose “Merge cells”.
- Choose “Merge all”.
Add an outside border
- Select the merged cells.
- Expand the Borders menu in the top ribbon.
- Choose the “Outer Borders” option.
Set the font type, size, alignment, and color
I like to use a narrow font type that first more letters into the cell. This allows longer names to display in full. My preference is “Archivo Narrow”.
- Select the merged cells.
- Expand the font list and choose “More fonts” (if you don’t see your preferred option).
- Change the font type to “Archivo Narrow”.
- Leave the font size at 10.
Set the text alignment
I prefer names to be left-justified and vertically centered in the merged cells.
Cells are left-justified by default so all you need to set is the vertical alignment.
- Select the merged cells.
- Expand the vertical alignment dropdown.
- Set to the middle option.
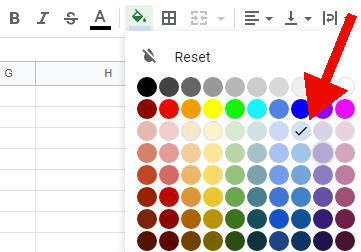
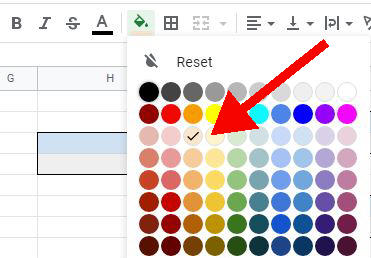
Format the coloring
I like to use a different color in the name field for male and female ancestors.
My preference is a light blue for males.
To change the color of the name field:
- Select the merged cells of H32 and H33.
- Set the background color to light blue.
Step 3: Copy For Male Ancestors From The 5th To 9th Generations
We are going to use copy-and-paste as much as possible in this process.
I’ve already worked out where each ancestor should go. Just follow these placements.
Select and copy the two merged cells H32 and H33.
Select each cell below in turn and paste the selected range into the cell. This copies the two cells.
4th Generation
- K16
5th Generation
- N8
- N40
6th Generation
- Q4
- Q20
- Q36
- Q52
7th Generation
- T2
- T10
- T18
- T26
- T34
- T42
- T50
- T58
8th Generation
- W1
- W5
- W9
- W13
- W17
- W21
- W25
- W29
- W33
- W37
- W41
- W45
- W49
- W53
- W57
- W61
We’ll deal with the final ninth generation later.
Step 4: Create The First Great-Grandmother
This is the first female box on the page.
The steps are the same as for the great-grandfather, except for the position and background color.
Select and copy the two merged cells H32 and H33.
Paste into cell K48.
Change the background color to light orange.
Step 5: Copy For Maternal Ancestors In The 6th To 9th Generations
Select and copy the merged cells K48 and K49
Paste the range into the cells listed below. This copies the two merged cells.
5th Generation
- N24
- N56
6th Generation
- Q12
- Q28
- Q44
- Q60
7th Generation
- T6
- T14
- T22
- T30
- T38
- T46
- T54
- T62
8th Generation
- W3
- W7
- W11
- W15
- W19
- W23
- W27
- W31
- W35
- W39
- W43
- W47
- W51
- W55
- W59
- W63
We’ll deal with the 9th generation next.
Step 6: Create The 9th Generation
This furthest generation has a different format from the others.
In order to fit the 256 people onto four portrait pages deep, the layout only gives a single row to each person in this generation.
We’ll format the first male and female boxes. Then we can copy them down the column.
- Set the color of cell Y1 to light blue.
- Put an outside border around Y1.
- Set the color of cell Y2 to light orange.
- Put an outside border around Y2.
Now copy these two cells down as far as Y64 is filled with a pink cell. Now we’ll create the connector lines for this quarter of the tree.
A Note On Connector Lines In Google Sheets
You can insert lines in Google Sheets and position them on the page. That’s how I prepare trees in Microsoft Excel.
But I find that lines in Google Sheets are very difficult to size precisely. The feature seems to be half-baked.
So, I use a trick to simulate lines. Instead of drawing the shape, I use cell border formatting instead.
You’ll see what I mean as you follow the next set of instructions.
Step 7: Create Connector Lines From The Grandfather To His Parents
Create a vertical line using borders:
- Select cells J17 to J48.
- Place a left border along these cells.
Create three horizontal lines using borders:
- Select cell J17 only and place a top border on this cell.
- Select cell J48 and place a bottom border on this cell.
- Select cell I32 and place a bottom border on this cell.
Step 8: Create Connector Lines From The 4th To 5th Generations
Create the first set of connector lines at this level:
- Place a left border along cells M9 to M24.
- Place a top border on cell M9.
- Place a bottom border on cell M24.
- Place a bottom border on cell L16.
Now we have a set of connector lines around one set of ancestors, we can copy the cells down to the other ancestors in this generation.
In other words, follow these steps:
- Select and copy the range of cells from L9 and M9 down to L24 and M24.
- Paste into cell L41.
Step 9: Create Connector Lines From 5th To 6th Generations
- Place a left border along cells P5 to P12.
- Place a top border on cell P5.
- Place a bottom border on cell P12.
- Place a bottom border on cell O8.
Now copy these bordered cells to the other ancestors in this generation.
- Copy the range of eight cells from O5 and P5 to O12 and P12.
- Paste into cell O21.
- Paste into cell O37.
- Paste into cell O53.
Step 10: Create Connector Lines From The 7th To 8th Generation
- Place a left border along cells S3 to S6.
- Place a top border on cell S3.
- Place a bottom border on cell S6.
- Place a bottom border on cell O4.
Now copy these bordered cells to the other ancestors in this generation.
- Copy the range of four cells from R3 and S3 to R6 and S6.
- Paste into cell R11.
- Paste into cell R19.
- Paste into cell R27.
- Paste into cell R35.
- Paste into cell R43.
- Paste into cell R51.
- Paste into cell R59.
Step 11: Create Connector Lines From The 8th To 9th Generation
This connection is just a single horizontal line.
- Put a bottom border on cell X1.
- Copy the two-cell range of X1 and X2.
- Paste the cells all the way down to X63.
Step 12: Copy The Grandfather Section To Create The First Grandmother Section
Take these steps to create the maternal section below what we’ve already got.
- Copy the range of cells from H1 to Z1 to H64 to Z64.
- Paste this range into cell H66.
- Change the fill color of the merged cells H97 and H98 to light orange.
Step 13: Create The First Father Name Box And Connector Lines
Take these steps to create the grandfather box:
- Copy the merged cells H32 and H33.
- Paste into cell E64.
The name boxes aren’t perfectly symmetric in our layout. That’s because I don’t want the merged name boxes to lie across a top or bottom page boundary.
That makes it easier to tape the pages together.
Take these steps to create the connector lines from the father to his parents.
- Place a left border along cells G33 to G97.
- Place a top border on cell G33.
- Place a bottom border on cell G99.
- Place a bottom border on cell F64.
Step 14: Copy To Create The Mother’s Section
We now have the paternal side in place.
We’re going to copy the lot to create the maternal side.
- Copy the range of cells from E1 to Y1 to E129 to Y129.
- Paste this range into cell E131.
- Change the color of merged cells E194 and E195 to light orange.
Step 15: Create The Home Person
The last step is to add yourself (or whoever the home person is).
- Merge the cells B128 and B129.
- Set your preferred background color.
- Add a border around the cells.
- Set the vertical alignment to middle.
Add the connector lines to the parents:
- Place a left border along cells D65 to D194.
- Place a top border on cell D65.
- Place a bottom border on cell D194.
- Place a bottom border on cell C128.
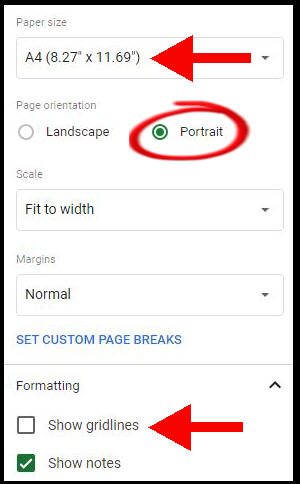
Step 16: Print Settings
When you print your nine-generation spreadsheet, use these settings:
- Paper Size: A4
- Page Orientation: Portrait
- Show gridlines: unchecked
This is the print box:
Done-For-You Bundle
If you want a short-cut, we have pre-made templates in Google Sheets. Everything is laid out perfectly, you just need to fill it in!
We have two versions in the spreadsheet package:
- The classic template with names and dates.
- The simpler template that shows names only.