Microsoft provides one family tree template for Excel.
It’s quite limited. But if you only need a tree that goes up to your eight great-grandparents, then it’s pretty good.
I find it easy to edit the name, date, and photo details. This article has some quick tips on setting up your tree.
The main drawback with the template is when you don’t want to include photos and/or dates in your tree.
If you remove the photo placeholders, the display looks awful. I’ll walk you through how to get it to look well without photos.
The template comes with buttons to remove and add ancestors. In my opinion, they’re not useful and you probably don’t need them.
But if you want to clear out some ancestor fields, I’ll show you how.
An Example Tree Made With This Template
This is the print preview of an example tree that I made using this template. Everything fits on a single landscape page:
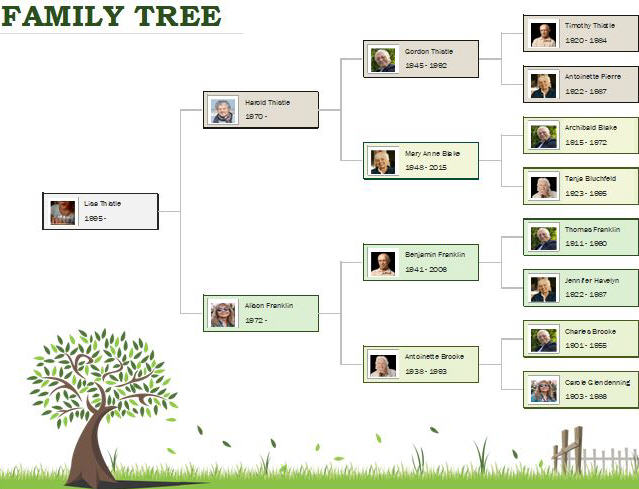
The graphics at the bottom come with the template.
Alternatives With More Generations
If you want more than four generations, the Microsoft template doesn’t provide this.
We have step-by-step tutorials that walk you through creating Excel trees from a blank page. Each has an accompanying video.
- create a 5-generation family tree in Excel
- create a 6-generation family tree in Excel
- create a 7-generation family tree in Excel
How To Install The Template Within Excel
This template doesn’t come bundled with recent versions of Microsoft Excel. But you can install it for free from within Excel.
Follow these steps.
- Open Excel and create a new workbook.
- Click the “File” menu.
- Click “More templates” at the top right of the screen.
- Enter “family tree” into the search box.
- Choose the template captioned “Photo family tree”.
- Click on the Create button.
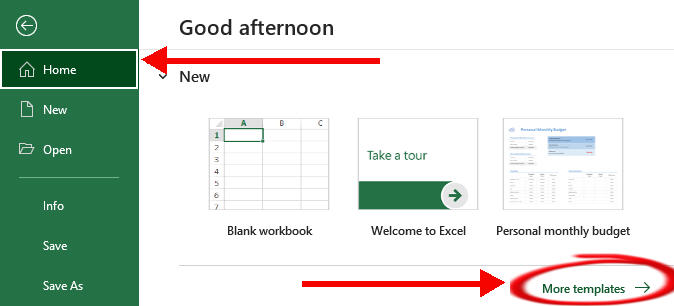
This search returns two templates so be sure that you pick the right one!
If you’re curious about the one you’re skipping, check out our tutorial on Excel’s Family Tree Generator Template.
Working With The Family Tree Template
Microsoft confusingly describes this as being a tree “up to three generations”. It’s written at the top of the page.
But they’re selling themselves short. This is a four-generation tree. It goes up to great-grandparents.
Despite that confusion, I find this template very easy to use. It lets you add and edit:
- first and last name
- dates
- photo
The name field is long enough to handle lengthy first and last names that add up to nineteen characters.
If your ancestor name is a little longer, then the template truncates the last few characters. That ensures they don’t spill outside the boxes.
The date field is labelled “birth year”. But there’s ample space to enter both a birth and death year. That’s what I did in the example in the opening section.
Several merged cells are formatted to provide a placeholder area for the embedded image.
To replace the default image with your own pictures, right-click the image and choose “Change Picture” from the menu.
How To Remove Photos From The Template Format
I said that the template was easy to use.
The big exception is if you want to remove the placeholders for the photos. In other words, you don’t want photos in your tree.
When you delete the default image, this is what you get:
The white box is a set of merged cells with a border. Take these steps to clean this up:
- Select the box, right-click, and choose “Format cells”.
- Switch to the Alignment tab and uncheck the “Merge cells” box.
- Select all the cells that now make up the boxed area.
- Right-click and choose “Format cells”.
- Switch to the Border tab and select the “None” preset.
- Select all the white cells and change the background color to match the other cells.
Now you’ve got the ugly box removed. But the name and date fields are now aligned too far to the right of the box.
Take these steps to clean this up:
- Select the name field.
- Scroll left to select the unmerged cells that had been part of the placeholder.
- Right-click and choose “Format cells”.
- Switch to the Alignment tab and check the “Merge cells” box.
- Repeat the above steps for the date field.
Now that you’ve removed the photo, the name looks a little small in the box. My preference is to increase the font size of the name from 12 to 16.
If you want to remove all the photos, you should repeat this process for each person.
Is that a pain in the neck? Yes.
It would have been better if Microsoft had provided several variations of this template to include or exclude photos.
How To Remove Dates From The Template Format
Do you want a display with names only?
It’s easy to clear out the text in the date field. But that leaves you with a “top-heavy” box like this:

I would want to make the name field vertically centered in this box.
To do so, follow these steps:
- Select the name field and the empty date field beneath it.
- Right-click and choose “Format cells”.
- Switch to the Alignment tab and check the “Merge cells” box.
That’s it! Now, repeat this action or all the boxes.
Using The “Remove Ancestors” And “Add Ancestors” Buttons
These buttons work a little differently than you may expect.
Let’s say that you have no information about your paternal grandfather but you know the name of your paternal grandmother and her parents.
You would like to remove the paternal grandfather and his two parent boxes completely from the display.
Two tips
The best tip I can give you is that you don’t use the buttons on the box that you want to remove. In other words, don’t select a great-grandparent and click “Remove Ancestors”.
The button literally means “remove the ancestors of the person I have selected”.
The next tip is that you don’t need to select the entire ancestor box you want to work with. Just select any cell within the box.
Steps for removing a branch
Select any cell in the paternal grandfather box and click the “Remove Ancestors” button. Both his parents will disappear.
But that still leaves the paternal grandfather in place. How do you remove this box?
If you select a cell in the father’s box and click “Remove Ancestors”, then all the father’s ancestors will be removed. That includes his mother and her parents.
If that’s what you want, then great! But our scenario wanted to leave the father’s maternal line in place.
There’s no way to achieve this by only using these buttons. Instead, you’ll have to do some manual removing too.
Removing a single ancestor manually
The solution to the above problem is to remove the paternal grandfather box manually.
These are the steps:
- Select the name and date fields.
- Right-click and select “clear contents” from the menu.
- Click the image and delete it.
- Select every cell within box border (there may be more small cells than you think!)
- Change the fill color to white.
- With every cell selected, use the border drop-down in the Home menu to set to “No Border”.
That’s it for the Ancestor box.
The gray lines are still in place. These aren’t actually shapes, they are cell borders!
To remove them, select the cells and set the adjacent cells to “No Border”.
Saving Your Generated Template
If you try to save your family tree as the default “.xlsx” extension, you will get a warning message.
This is because the workbook contains code.
Instead of using the default extension, you should save it with either of these two extensions:
- Excel macro-enabled workbook (.xlsm)
- Excel binary workbook (.xlsb)
But even when you save it in the correct format, you will encounter another warning message with every save.
The message mentions personal information and something called the Document Inspector.
What Is The Document Inspector?
I’ve been using Excel for over twenty years, and I’d never seen this message or heard of the Document Inspector.
This is a feature that sees that there is personal information (name and dates) about people in this spreadsheet. So, it’s letting you know about this before you save the document.
You can safely ignore this message.
But it doesn’t go away – you’ll get it each time you hit save.