This tutorial takes you step-by-step through creating a four-generation family tree in Google Sheets.
A four-generation tree goes back to eight great-grandparents.
This tutorial builds a tree that prints on a single landscape page.
If you’re too busy for the twelve steps in this tutorial, jump down to the end to grab our “done for you” Google Sheets template bundle.
What A 4-Generation Family Tree Looks Like
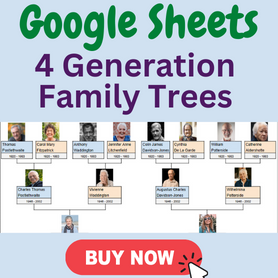
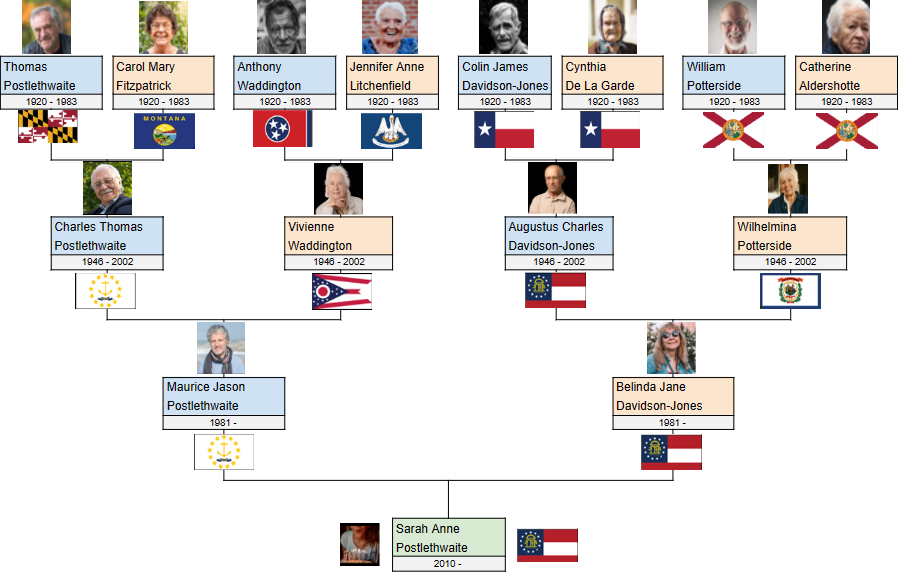
Here is an example of what one looks like when printed in Google Sheets.

If you want one more generation, we have a tutorial on creating a five-generation tree in Google Sheets.
Indeed, we have tutorials for most tree sizes – here’s a full list of family tree templates.
Step 1: Create A Blank Online Spreadsheet
I’m assuming that you have a Google account. If not, sign up – it’s free.
Create a blank spreadsheet at this link.
By default, a new sheet prints as an A4 sheet in landscape mode. That’s exactly what we want.
Step 2: Set The Column Widths
To change the width of any column, follow these steps:
- Select the entire column by clicking on the letter at the top.
- Right-click and choose “Column Width” from the drop-down menu.
- Enter a size.
To set the width of multiple columns together, hold down the Ctrl key while clicking the column letters.
Now you know how to do it, set these widths (in pixels):
- set columns A, B, E, F, I, J, M, N, Q, R, U, V, Y, Z, AC, and AD to 55
- set columns C, D, K, L, S, T, AA, and AB to 5
- set columns G, H, O, P, W, and X to 10
Step 3: Create The Name Area For The First Male Ancestor
You may want to put photos of ancestors above their names. So, we’ll leave plenty of space above the name area.
You may not want photos, but I suggest you follow my instructions to the end. Then you can tinker with the layout.
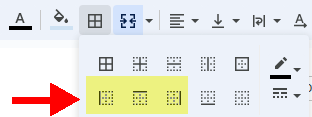
Merge cells
Merge cells A5 and B5 to hold the first name. To do so, follow these steps:
- Select the two cells
- Click the “merge cells” feature (picture below).

Merge cells A6 and B6 to hold the last name.
Draw a border
Set the border of the top merged cells by choosing a top, left, and right border line.
Set the border of the bottom merged cells by choosing a bottom, left, and right border line.
Set the background color
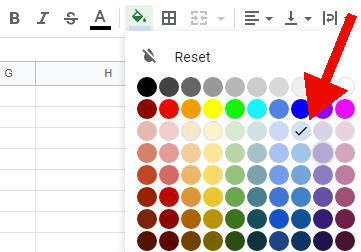
I like to use a light-blue for male ancestors. To change the color of the name box:
- Select cells A5, B5, A6, and B6.
- Expand the fill color tool in the ribbon.
- Choose “light blue 3”.
Optional: change the font type, size, and alignment
I like the default font type, size, and left alignment.
Some people prefer a middle alignment for the names. Now is the time to set what you want.
Step 4: Copy To The Other Male Ancestor Areas
We’re now going to save ourselves a lot of clicking by using copy-and-paste.
Copy the merged cells at A5 and B6.
Paste what you’ve copied into these cells:
- I5
- Q5
- Y5
- B13
- R13
- F21
Step 5: Create The First Female Ancestor
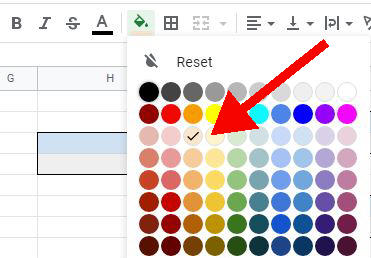
I like to use a light-orange background color for female ancestors.
- Copy the merged cells at A5 and A6.
- Paste into E5.
- Change the background color of the top and bottom merged cells to “light orange 3”.
Step 6: Copy To The Other Female Ancestor Areas
Copy the merged cells at E5 and E6.
Paste what you’ve copied into these cells:
- M5
- U5
- AC5
- J13
- Z13
- V21
Step 7: Create The Root Person
- Copy the merged cells at E5 and E6.
- Paste into N29.
I like to set the background color of the root person to “light green 3”.
Step 8: Create The First Set Of Intersecting Lines
I want a fork shape like this:

We could insert a line shape onto the sheet, but I don’t like this feature in Google. It’s very finicky to draw shapes.
So, I use borders to create the lines instead.
- Select cell B7 and put a left and bottom border on the cell.
- Select cell E7 and put a right and bottom border on the cell.
- Select cells C7 and D7 and put bottom borders on the cells.
- Select cells C8 and C9 and put a right border on each cell.
That’s a lot of clicking, but we’ll use copy-and-paste for the other three sets of ancestors in this generation.
Step 9: Copy The Previous Lines To Three Areas
Select and copy the range of cells from B7 to E9 (this range includes the cells with the borders).
Paste into these cells:
- J7
- R7
- Z7
Step 10: Create The Next Set Of Intersecting Lines
We’re now dropping down a generation.
- Select cell D15 and put a left and bottom border on the cell.
- Select cell KI5 and put a right and bottom border on the cell.
- Select the six cells from E15 to J17 and put bottom borders on the cells.
- Select cells G16 and G17 and put a right border on each cell.
Step 11: Copy The Previous Lines Once
Select and copy the range of cells from D15 to K17 (this range includes the cells with the borders).
Paste into cell T15.
Step 12: Create The Last Set Of Intersecting Lines
This is from the parents to the root person.
- Select cell H23 and put a left and bottom border on the cell.
- Select cell W23 and put a right and bottom border on the cell.
- Select the six cells from I23 to V23 and put bottom borders on the cells.
- Select cells O24 and O25 and put a right border on each cell.
And that’s it! Whew!
You now have the vertical 4-generation family tree structure in Google Sheets.
You can stop and work with what you’ve got i.e. add the correct names and print out the sheet.
Alternatively, you can keep going with some optional extras.
Step 13: Optional Actions
I’ve left plenty of space for an image above each name box.
You may also want to add a merged field beneath each name box to hold the birth and death years.
I also like to add flag icons beneath each person to show their birth location. The full shebang can look like this:
Of course, you have to add the photos and flag icons.
If this seems like too much work, read on for our done-for-you bundle of many variations of four-generation trees.
Grab Our Done-For-You Bundle
Does this all seem like too much fiddling around? I’ve prepared a bundle of eight formatted templates in Google Sheets:
- Template with names only
- Template with names and dates
- Template with names, dates, and photos
- Template with names, dates, photos, and location flags
- Template with names and photos
- Template with names, photos, and location flags
- Template with names and location flags
- Template with names, dates, and location flags
In addition, I’ve included perfectly-sized images for 50 U.S. state flags and 48 country flags.
All this for the price of a cup of coffee. Grab it at our Gumroad store here: