This article shows you how to add a family tree to GEDmatch by importing a GEDCOM file to GEDmatch.
We’ll also take a detailed look at privacy and living people. You should be familiar with how this works on any site where you upload a GEDCOM.
Video Guide
If you’d prefer a video walkthrough of the upload, then here you go. This video shows you how to:
- Use free software to privatize living individuals in your GEDCOM file.
- Upload the GEDCOM to GEDmatch.
- Fix issues with the upload.
Creating A GEDCOM File For Upload To GEDmatch
A GEDCOM file contains a family tree in a format recognized across all the main genealogical sites and software.
You will have to create a GEDCOM file with the family tree details you wish to include. Popular websites like Ancestry, MyHeritage, and Geni let you export your family tree to a GEDCOM file. Here are tutorials for each site:
- Download your ancestry tree to GEDCOM
- Export your MyHeritage tree to GEDCOM
- How to export a Geni tree to GEDCOM
A disadvantage to the online sites is that you may have to download a full tree. You may not be able to pick and choose specific branches. That is the case with Ancestry and MyHeritage.
You can take an intermediate step of importing the GEDCOM file into software and exporting the sections that you prefer.
RootsMagic Essentials and MyHeritage FamilyTreeBuilder are two free options.
There are walkthroughs in these two articles.
GEDmatch Wants You To Privatize Living People
GEDmatch is clear in its instructions about what to do with living people in your GEDCOM file:
If you believe that the person is alive, you should privatize the entry yourself. You would do so by changing the names in your tree to something like “LIVING” before exporting it to the GEDCOM file.
This would be very tedious using the Ancestry or MyHeritage website. You can use free software to achieve the same results. Here’s the export feature in RootsMagic Essentials:

Note that you can set an option that changes the names of living people to “LIVING”. You can probably do something similar with other software.
So, to take advantage of the software, you simply add an extra step between exporting your tree to GEDCOM and importing this to GEDmatch.
First, Import the GEDCOM file into RootsMagic or other software. And then export it again with the privatized option.
How Does GEDmatch Deal With Living People In GEDCOM Files?
GEDmatch attempts to privatize living people in your GEDCOM file. If the GEDmatch software recognizes that a tree profile is a living person, it will replace the name and dates with the word “LIVING”.
But wait – doesn’t GEDmatch tell you to privatize living people yourself? Why go to the effort if the import process tries to do so too?
Well, the GEDmatch import process has been a little erratic in the past. I think they’re covering their behinds, so to speak.
And personally, I don’t rely on the process either. I take steps to hide living people before uploading to GEDmatch.
But that being said, let’s take a look at what happens during the import. How does GEDmatch recognize living persons in GEDCOM files?
The assessment is partly based on the presence or absence of death details in the profile.
If there is neither a date nor location of death, the tree profile may be categorized as living and is privatized. This depends on additional rules if there is a birth year present.
With a birth year, the status depends on the calculated age of the profile.
If the birth year is within a living range e.g. a hundred years, then the profile will be considered living and is privatized.
If this isn’t clear, then the examples I used when testing the process should explain it all.
Testing GEDmatch Privacy
I created a test tree on Ancestry that included tree profiles with:
- Birth and death details
- A recent birth date (1970) and no death details
- A distant birth date (1800) and no death details
The third test profile was to see how GEDmatch dealt with long-ago birth dates and no death details.
I uploaded the exported GEDCOM file with one account and viewed it with a separate account. Here are the results.

Reading from the bottom up, this is what I see:
- born in 1974 with no death details provided – PRIVATIZED
- no birth or death details – PRIVATIZED
- born in 1800 and no death details – NOT PRIVATIZED
I conclude that GEDmatch does indeed include an extra rule if a tree profile has a birth date and no death date.
If the birth date is within living range, the profile is privatized. Otherwise, it is public.
What Size Tree Can You Upload To GEDmatch?
There are limits on the number of persons that GEDmatch will accept in a GEDCOM file.
There is a hard limit of 24 thousand profiles. In other words, a file with more than 24 thousand persons will not be accepted.
However, there is a soft limit of 10 thousand profiles. You can upload more people, but the utilities will only work with the first 10K entries in the file.
So, features like GEDCOM Search won’t make it past the soft limit.
If your exported GEDCOM file has over 10K persons, I suggest that you cut it down to size.
You can import the file into free software such as RootsMagic Essentials or MyHeritage FamilyTreeBuilder. These desktop applications will let you delete entire branches at a time.
Does GEDmatch Have Private Trees?
GEDmatch no longer allows private trees, and all uploaded GEDCOM files are public. You should privatize living people or remove them from the file before uploading to the site.
You may find older online articles mentioning private trees on GEDmatch. These are out of date.
A Step-By-Step Guide To Uploading A GEDCOM File To GEDmatch
You need a free account on GEDmatch to add your family tree with a GEDCOM file.
- Use the “Upload GEDCOM” link on the Home Page under the Family Trees section.

2. Set the tree name to something descriptive.
3. (Optional) Unlink the tree or link it to a different DNA kit.
By default, GEDmatch will link the tree to one of your DNA kits. If you don’t want the tree linked to any kit, then change the option to “No kit selected”.

If you have multiple kits, you can switch the chosen kit to another.
4. Confirm that you meet GEDmatch privacy requirements.
I discussed the privacy requirements in a previous section. Suffice it to say here that you need to change the default “No” selection to “Yes”.
5. Use the “Choose” button to find the file on your local machine.
6. Use the “Upload” button to start the import process.
7. Stay on the page until the process completes.
The GEDCOM files I’ve uploaded have taken under a minute. But they’ve been under one thousand people. Larger files may take a little longer.
8. Verify that GEDmatch has correctly assigned the “point person”.
This step is important because you may need to fix the tree.
Important: check the point person is correct
Who is this tree for? GEDmatch refers to this as the “point person”. Ancestry uses the term “home person”. Others call this the “root person”.
Either way, it’s important that you check that GEDmatch has assigned the point person status to who you expect. This is not always the case. It’s easy to change but you need to check!
When the upload completes, the processing page shows a link to the Point Person. The description may look correct, but you should click the link to double-check.
If the link takes you to an entry in your tree that is not your preferred point person (e.g. yourself), then you should take these steps:
- unset the point person status of this entry.
- find the correct person in your tree.
- set that person to be the point person.
In the demo video at the top of this article, I encounter exactly this problem. You can watch as I take these steps to fix the issue.
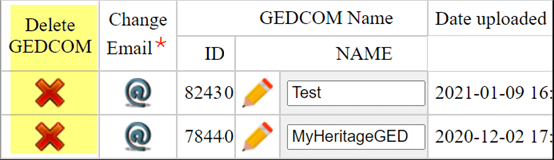
Your GEDCOM number
GEDmatch assigns a unique multiple digit number to every GEDCOM file uploaded to their database.
This number is displayed beside the tree details on your home page.
How To Delete Your Family Tree From GEDmatch
You can remove your tree from GEDmatch at any time.
Tree contents can not be edited within GEDmatch. So, if you want to update details you must delete the tree and upload a new version.
To delete a tree, open the GEDCOM management page. You’ll find the link under your family trees on the Home page.

Scroll down past all the instructions to get to the tree management section.
Hit the big red X beside the tree you want to remove.
Using the “1 GEDCOM to all” Tool
The GEDCOM utilities are under the “Genealogy Comparisons” section on the Home page.
The “1 GEDCOM to all” tool compares your GEDCOM file to all other uploaded trees on the site. It tries to find matches between individual tree profiles.
Use the GEDCOM number assigned by GEDmatch. This isn’t the name you set for the tree. The numbers are listed in the Family Trees section on the Home page. You can experiment with the different matching thresholds.
I find that the location threshold isn’t very useful. Even a 100% threshold matches Ireland locations with Wales, England, and the USA. The name matching seems more reliable.
GEDCOM To Spreadsheet Conversion!
Would you like to convert your GEDCOM to a spreadsheet with every person in your family tree?
Check out our conversion service for the full range of features at a low price.
2 thoughts on “How To Upload A GEDCOM Tree To GEDmatch”