You can widen your family tree research by putting your DNA onto several different DNA websites. Some of your DNA matches will have done the same, and it can be really useful to have information from two sites to analyse them.
This article details four ways to find your Ancestry DNA matches on MyHeritage and, of course, vice versa.
Why Find Your Ancestry DNA Matches on MyHeritage?
Some of my DNA matches have a much bigger tree on one site that they’re actively maintaining. The second site may have a bare-bones three-person tree.
This is a general advantage to having your DNA across multiple sites: you multiply your chances of finding that well-researched tree with many branches.
A specific advantage of MyHeritage is that they show you the shared cM between your shared matches. It will even suggest that two matches are first cousins – this led me to a breakthrough. Ancestry doesn’t show this.
How to Transfer Your Ancestry DNA to MyHeritage
If you’ve purchased a DNA kit from both Ancestry and MyHeritage, then you can skip this section.
MyHeritage, unlike Ancestry, allows you to upload your raw DNA results from other test sites FOR FREE. You need to pay for some MyHeritage services, but you can review your DNA matches without a paid subscription.
If you haven’t done so already, here are instructions to download your raw DNA from Ancestry.
And here are instructions to upload your DNA to MyHeritage.
Four Ways to Find your Ancestry DNA Matches on MyHeritage
I’m going to walk through four different ways in detail, with a lot of tips and tricks.
- Scan by eye for match names you recognize
- Scan by eye for familiar faces and photos
- Use search and filter options for match names and tree entries
- A semi-automated way to identify match names across Ancestry and MyHeritage
Semi-automated
The fourth way is the most complex, as it uses Excel scripting to automate what would otherwise be a long and tedious process.
We have a YouTube tutorial that takes you step by step through the process. So, if you’ve come to this article to supplement the video – scroll down for the twelve steps.
Scan by Eye for Match Names
This technique is probably what you’ve already done.
You open both DNA Match list pages in two browsers side by side, and run your eye down each page. I don’t recommend it if you’re barely a wet week after getting your Ancestry results, as you’ll simply be overwhelmed.
But if you’ve been working your DNA matches on one site for some time, then you will know the match names on the first few pages i.e. your closer matches.
You will also have several matches that you’ve researched in detail. No, you can’t write out a list from memory – but your eyes will tell you when you see those names elsewhere.
Realistically, this method is for spotting your closer matches across the two sites.
At the time of writing, I have 16 thousand Ancestry matches and 3,600 matches on MyHeritage. You may well have multiples of those numbers.
There’s no way you can scroll down an endless list looking for names that pop out at you (that’s where the fourth method comes into play).
But it’s a good place to start.
You’re looking for two routes to a pot of gold (I mean a fantastic well-researched tree). That third cousin on Ancestry with a tiny tree is rocking a huge tree on MyHeritage? Pot of gold!

More shared matches to review
The second route is the scenic one that takes even longer: examine those shared matches on both sites.
Let’s say that your Ancestry third cousin is on MyHeritage with the same tiny tree. That’s disappointing! But a shared match on one of the sites may have a great tree.
This happened for me just recently: when I reviewed our shared matches, one was predicted by MyHeritage to be a first cousin of the match.
And that person had a fantastic tree going back five generations. Pot of gold!
Scan By Eye for Familiar Faces (and Photos)
This is different from scanning for names because of how the human brain works. We are so great at facial and image recognition, that we can surprise ourselves.
I was researching a MyHeritage match, and one of his shared matches had a profile photo. And I idly thought: that guy looks familiar, who do I know that he looks like? A celebrity? A neighbor?
That guy had the same profile photo on Ancestry, but with no tree. I hadn’t taken any interest in him on Ancestry, but I’d scrolled past him on several occasions over months.
It’s not like reading and recognizing a name. The tip here is that if you spot a photo that looks vaguely familiar, but you can’t quite place…follow up on it on the other site.
And it’s not just headshots. One of my Ancestry matches has a profile photo of a glass of martini, complete with olive. I smile every time I scroll past.
No doubt, I’ll recognize her if she pops up on MyHeritage. And that guy flexing in the bathroom mirror with his shirt off? Dude, we’re your relatives! Put your shirt on!
Search and Filter for Match Names and Tree Entries
Now we’re getting more focused and strategic. This technique uses the Search and Filter functionality on MyHeritage to look for specific match names.
Searching is a little different between Ancestry and MyHeritage. Ancestry has separate search boxes for match names and tree entries:

The equivalent search box on MyHeritage looks for match names and “ancestral” names (i.e. in the direct line).

You can utilize this method with two approaches: bottom-up and top-down.
Bottom-Up: Match Search
First, just remember to include MyHeritage when you’re doing targeted research on an Ancestry match.
But don’t jump in and out, because you’ll find yourself repeating the same work.
To keep it strategic, copy the Ancestry match and the shared match names into a spreadsheet – or even just into notepad as a list. This is your MyHeritage “hit list”.
Work your way down the list, throwing each name into MyHeritage.
I’ll often find a match who has a much bigger tree on MyHeritage, but I still can’t work out the connection. But I’ll add a note on the Ancestry match to remind myself that this person has a great MyHeritage tree.
Top-Down: Tree Search
The other approach is when you have more time on your hands for a wider top-down phase of research. If you work in fits and bursts on your Ancestry tree, then this is a good thing to do at the end of the year.
Make a hit list of names from your tree.
Of course, you include your direct line ancestry names. But go wider. Scan your branches for the more unusual names, which may even be the spouses of your blood relatives.
I have a hit list that includes a long deceased “Constantine Connolly”. Being Irish, there’s no point in me looking for Patrick Connolly. But Constantine? I’ve got great hits with that guy.
Use (Some) Automation to Find Your Ancestry DNA Matches on MyHeritage
By now, you may be thinking there must be a better way.
Ideally, the two competitors would collaborate. Wouldn’t it be great if there was a little MyHeritage icon that would show up beside your Ancestry matches? Hey, come check me out on MyHeritage where I’ve got a much better tree!
Well, that ain’t gonna happen (without a takeover).
But here is a high-level way to get a comprehensive list of match names that appear on both sites.
- Get a list of all your MyHeritage matches into a spreadsheet.
- Add a second column with all your Ancestry matches
- Generate a third list with the common names
MyHeritage takes us a third of the way there. The free subscription allows us to download a list of all our matches.
The final third of this path is just spreadsheet manipulation. I’m going to show you one way to do it in this article.
The Ancestry Issue
It’s Ancestry in the middle third which is the massive roadblock. Ancestry lets you download your raw DNA data. But they do not provide a download of your DNA matches.
There used to be several third-party applications and chrome extensions that would give you a file with your match details. In the summer of 2020, Ancestry shut down every third-party utility they could find (there may be one or two that are under the radar).
One of Ancestry’s gripes was automated screen-scraping. The method in this article does not use automation to download your Ancestry matches. The automation comes into play at a later stage.
Oh no, does it have to be Microsoft Excel?
I do the spreadsheet manipulation presented here using Microsoft Excel. I’m sure you can use Open Office or Google Sheets, but you’ll have to know them better than I do.
So, let’s crack on.
There are multiple ways to achieve the desired results i.e. a common list of match names. The particular way I describe here worked for me.
I’m sure there could be improvements, particularly when manipulating the spreadsheet. Please do comment with any suggestions.
There’s a companion YouTube video that walks through these exact twelve steps. If you find any of the narrative confusing here, just jump to that step in the YouTube video.
STEP 1: Download your matches from MyHeritage
MyHeritage makes this really easy. You just have to find the right button.
Go to the Match List page and click on the triple-dot button at the far right of the menu.
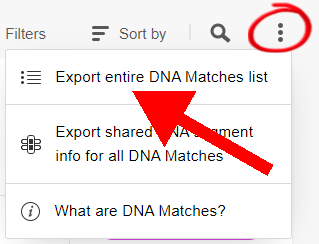
The download is the first item in the drop-down.
In three to four minutes, an email will arrive with a zip file. Extract and open the CSV file in Microsoft Excel.
STEP 2: Create a new spreadsheet with MyHeritage match names
We’ll leave the original download file intact. Save the opened file as an Excel spreadsheet, with the file type of “.XLSX”.
Now, remove all columns apart from the match name (which is the second column). Just to keep track of everything, rename the header as “MyHeritage”.
Remove <Private> from the text
Users may privatize their first names. Their display names look like “<Private> Jones”. The brackets mess up some later Excel features.
Use find-and-replace to remove “<Private> ” (with a space). You’re replacing this text with an empty string i.e. don’t put anything into the replace box.
STEP 3: Remove MyHeritage duplicate names
Okay. Now for some Excel ninja stuff…
- Highlight the entire column with the MyHeritage match names.
- Go to the Data tab in the top menu
- Click on “Remove Duplicates” in the Data Tools section.
What this does is collapse three matches named “John Smith” into a single row.
Remember, this isn’t finding real people across both sites. It’s a blunter instrument. We want to identify a unique match name that appears on both sites.
They may not be the same person! You’ll have to verify that – we’ll get to that later.
STEP 4: Set up a filter on Ancestry matches
Now we’re jumping out of Excel and going to the Ancestry match list page, where we’re going to set up a filter to define the matches we want to work with.
The reason for filtering is that Microsoft Excel is not great with manipulating large volumes of data. In my experience, Open Office has similar problems.
If you’re working with too many matches in a single spreadsheet, the later steps will throw up the endless spinning blue wheel.
How many is too many? It will depend also on your machine. And don’t be too impatient. Some steps may take five minutes for Excel to do its work.
Anyway, my first filter in the demo video selects Ancestry matches that have linked trees and are in a specific centimorgan range. A linked tree gives you the best chance of identifying that this match is actually the same person as a MyHeritage match with a similar tree.
STEP 5: Scroll Down to the End of Ancestry
You need to get all the matches displaying on the same web page. Yes, you need to scroll down to the end of your filtered results.
You can hold down the mouse button, or keep your thumb on the Page Down keyboard key. If that sounds like a massive bore, you have alternative choices. Some chrome extensions will scroll down the page for you. But for this article, I went old-school.
Check out the demo video where I use an up-turned bottle to press the Page Down key, while I go make myself a cup of coffee.
Just be sure that the top is screwed on tightly. I do not accept liability for shower gel all over your keyboard.
STEP 6: Copy and Paste Everything to a New Worksheet
Select the entire web page (I use ctrl-A).
You’re going to paste it into a new second worksheet in your spreadsheet. So, add a new blank worksheet beside the first MyHeritage sheet.
The important part of this step is to use the Paste Special function to paste as “Text”. Otherwise, you get all the match photos. You want to leave those big images behind.

STEP 7: Remove Blank Lines from the Ancestry Worksheet
You’ve now got the Ancestry web page splurged onto your second worksheet. Yes, it looks a mess. We’re going to knock it into shape.
The first thing to do is to remove blank lines. These seem to occur after a note you’ve added to a match. If we don’t get rid of them, then the next step won’t work.
To do this, follow these steps:
- Highlight the entire column
- Click on the “Find and Select” menu in the Home tab.
- Choose “Go to Special” (the fourth item in the menu)
- Select the “Blanks” option and click OK
- Click “Delete” in the Cells box of the Home tab (it’s to the left of “Find and Select”)
STEP 8: Copy and Run an Excel Macro
If you’ve never edited an Excel macro before, then this may look a little scary. Don’t worry. Just follow along, picture by picture. Or watch the YouTube video step by step.
- Go to the Developer tab
- Click on the left-most icon labeled “Visual Basic”

A new form will open, which you may never have seen before. This is where we can create and run code. The top left box, the project window, shows folders and files where you will store your new code.
By default, the current worksheet is highlighted. This is probably Sheet2. It will look like this (my spreadsheet is named AugustComparison):
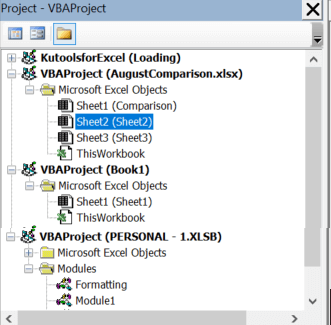
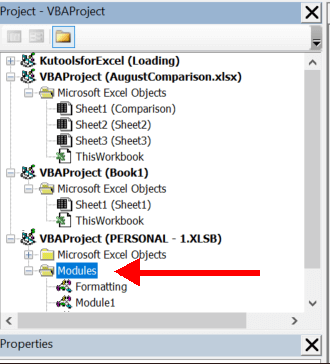
We’re going to switch to the Personal workbook. Just click on the modules folder under your “Personal.XLSB” project. (In the pic, mine is named slightly differently).
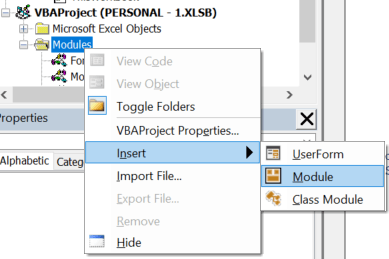
Now you want to create a new module. Right-click the modules folder, choose “Insert”, and select “Module”.
The big window on the right is your new code page. You are simply going to copy and paste a piece of code into that window. And below is the code. Copy the entire blue text into the big window.
Sub HighlightMatchNames()

    Range("A2").Select
    Dim vNameCellOffset As Integer, vName As String

    ' stop when an empty cell is reached.
    Do Until IsEmpty(ActiveCell)

        If InStr(1, ActiveCell.Value, "1st–2nd Cousin") > 0 _
            Or InStr(1, ActiveCell.Value, "2nd–3rd Cousin") > 0 _
            Or InStr(1, ActiveCell.Value, "4th–6th Cousin") > 0 _
            Or InStr(1, ActiveCell.Value, "5th–8th Cousin") > 0 Then

            If InStr(1, ActiveCell.Offset(-1, 0).Value, "Managed by") > 0 Then
                vNameCellOffset = -2
            Else
                vNameCellOffset = -1
            End If
            ' highlight cell with user name in rid
            ActiveCell.Offset(vNameCellOffset, 0).Interior.Color = vbRed

            ' if the user has an image, the name will be duplicated - this dedupes it
            vName = ActiveCell.Offset(vNameCellOffset, 0).Value
            If Left(vName, Len(vName) / 2) = Right(vName, Len(vName) / 2) Then
                ActiveCell.Offset(vNameCellOffset, 0).Value = Left(vName, Len(vName) / 2)
            End If

        End If
        ' Step down 1 row from present location.
        ActiveCell.Offset(1, 0).Select
   Loop
End Sub
What does the Macro do?
It starts at the first cell in your worksheet and steps down row by row.
The script is looking for cells with a match name. It just so happens that the Ancestry category (1st-2nd Cousin, 4th-6th Cousin etc) is just below the names, unless there is a manager in between. That’s how the name cell is identified.
Eagle-eyed readers may notice that I don’t include the Parent/Child category. I figure you’ll know if these matches are on MyHeritage.
When it finds the match name, it colors the cell as a deep red.
There is one more piece of jiggery-pokery. When matches have a photo, the names are “doubled” when copied into the Excel spreadsheet. So “John Smith” appears as “John SmithJohn Smith”. There are a few lines in the macro to de-duplicate the string.
And that’s it, nothing to it!
Run the Macro
Whew, the hard part is over. All you have to do now is click the green button. The one with the triangle on its side.

If you get any kind of syntax error, you’ve likely missed a line when copying the text. Or inadvertently added some extra line from the article.
The script may take a bit of time to complete. The blue circle will spin, and you won’t be able to do anything else with the Excel sheet.
But you can do other stuff. Like, read more of our articles.
When it’s done, you will be able to use the Excel sheet again. You should see dark red lines like this, throughout the worksheet.
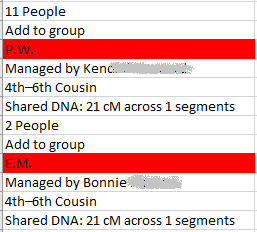
STEP 9: Filter and Copy the Ancestry Names
Now you’re going to see why we highlighted the names in vivid red. We’re going to apply a filter on the column.
Highlight the column with the names, go to the Home tab, and click on the “Sort & Filter” menu. Choose the Filter item.
The little filter icon appears on the top cell.
You’ll know when you go to expand the filter, whether you have too much data for Excel to handle.
If the blue wheel spins endlessly, you’ll need to crash out and go back to Step 4. This time, use the Ancestry filters to get a smaller number of matches.
But hopefully, the filter will expand and you will see this:
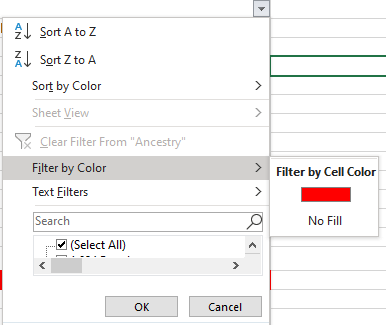
Filter by beautiful red, and voila! A list of Ancestry match names appears.
Paste the Values Only
We now copy and paste this list to the column beside the MyHeritage names in Worksheet 1.
But be sure to choose the paste option which pastes values only.
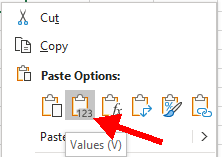
In the picture, I’ve right clicked into the cell where the paste will start.
I choose the second paste option, which is values only.
STEP 10: Remove Duplicate Ancestry Names
We’ve already removed duplicates from the MyHeritage list of names. We now need to do the same for this new Ancestry list.
Highlight the second column (the Ancestry names column) and repeat the same process described in Step 3 to remove duplicate cells.
Just be sure that you only have the Ancestry column highlighted. You don’t want to impact the MyHeritage column.
A pop-up window will ask you if you want to expand your selection to include the MyHeritage column. DEFINITELY NOT. You must select the alternative option, which is to “Continue with the current selection.”
STEP 11: Highlight Duplicates between MyHeritage and Ancestry
This is the culmination of the process, hurrah. You will ask Excel to identify the match names that appear in both columns.
First, you highlight the two columns by selecting both.
Then you use the Conditional Formatting menu to highlight duplicate values.
To get there, go to the Home menu and find the “Conditional Formatting” icon in the Styles section.
In the drop-down menu, choose the first item: “Highlight Cells Rule”. The very last item in the new drop-down is “Duplicate Values”.
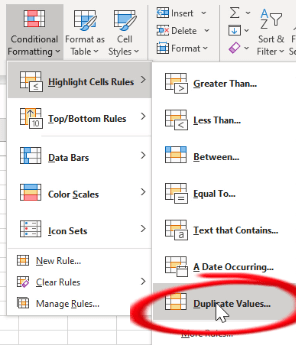
You should see some duplicates highlighted in a light pink.
You can now apply a color filter to either column to generate a hitlist of match names. In other words, apply a filter and choose pink as the color. The filtered column will only show the matches that appear in both lists.
Select the entire column, copy, and past the values into a new worksheet. This is your Hit List for review. If you’ve made it this far – well done!

STEP 12 – Rinse and Repeat for More Ancestry Matches
Now you can go back to step 4 and apply a different filter. Then repeat to step 11 to generate a different hit list
In the demo, I only took matches with a linked tree. In my next round I would take matches with an unlinked tree – while knowing that I’m risking getting the trees of spouses and neighbours (i.e. not a genetic relative).
If I’ve got a lot of time on my hands, I’d take Ancestry matches with no tree. The problem is identifying whether the same name on MyHeritage represents the same person. You’ll need to examine shared matches to evaluate this.
Are these matches really the same person on both sites?
It’s a fair question. If the match name is Ozymandius Humperdinck, you can be reasonably confident. Otherwise, you need to verify by looking at one or both of:
- Trees
- Shared Matches
Excel Improvements
I’m sure that a lot of the manual filtering steps could also be included in the macro. I’m just not familiar enough with VBA to write that macro!
If you’re reading this and you’re thinking – “come on, I could whip up a macro that does all this” – please reach out in the comments.
More Spreadsheet Tools
If you like using spreadsheets as part of your genealogy research, check out these articles:
- How to download your Ancestry matches (gets extra info into the spreadsheet)
- Using the Leeds Method on Ancestry matches
Thanks for posting this useful article. Initially I was concerned because I am a Mac user and Excel for the Mac does not have Visual Basic.
For the Ancestry matches, I realized that I already had a file of the matches from my use of DNAGedcom. I was able to use this to get a complete comparison of all matches in common, not just the ones with trees. In total I got 777 matches in common but this includes some with so this is approximate. This is more than I can deal with probably but I appreciate that you helped me obtain this.
Thank you for the feedback. I hadn’t realized that Visual Basic wasn’t available on the Mac.
Somehow my comment is missing the bit that says that some of the matches are ones where the name says Private.
I have a MacBook Pro and under “Tools” there is “Macro” and under “Macro” there is “Visual Basic Editor”. I haven’t tried creating the Macro yet but I will.
Good luck! I’ve rarely used Macs, so unfortunately can’t give any guidance.
Thanks. I will have to try it. Excel did not use to be able to run Visual Basic, but it looks like it may do so now.